Chapter I – ThinkPad Buttons
Note: I titled this referencing a keyboard, even though I am working on a touchpad. This is because most touchpads don’t use this type of build anymore, so I wanted to make the title more relevant.
Here in February of 2025, I have a good old IBM ThinkPad R52 laptop! It’s in pretty nice shape, and I easily was able to get everything working.
Well, for the most part. I discovered that the touchpad’s left-click button doesn’t work! This older laptop uses the nicer style of button, which is more like a keyboard key than it is a clicky button, like most laptops use.
In theory, the simple fix would be to replace the touchpad button module. In practice, this isn’t realistic, as the part is difficult to come by. So, I chose to investigate how this could be dealt with. I felt that there would likely be a simple explanation for such a thing, and otherwise, I’ve sure got nothing to lose.
Getting to the issue
First came the inspection – sure enough, as soon as I took got to the touchpad, I saw corrosion residue there, showing that liquid got in here at some point and messed with the circuitry. Looking closer revealed that the liquid ate away at the membrane trace that carries the left-click signal, therefore the circuit could never complete. That explains a lot!
Getting to the membrane is rather tedious, and only gets worse once you have to work with the membrane itself. On my laptop, after the palmrest casing is removed, the metal touchpad bracket must then be removed, and then the plastic backing (with the key clips) must be torn off. This then exposes the membrane sheet that is in between.

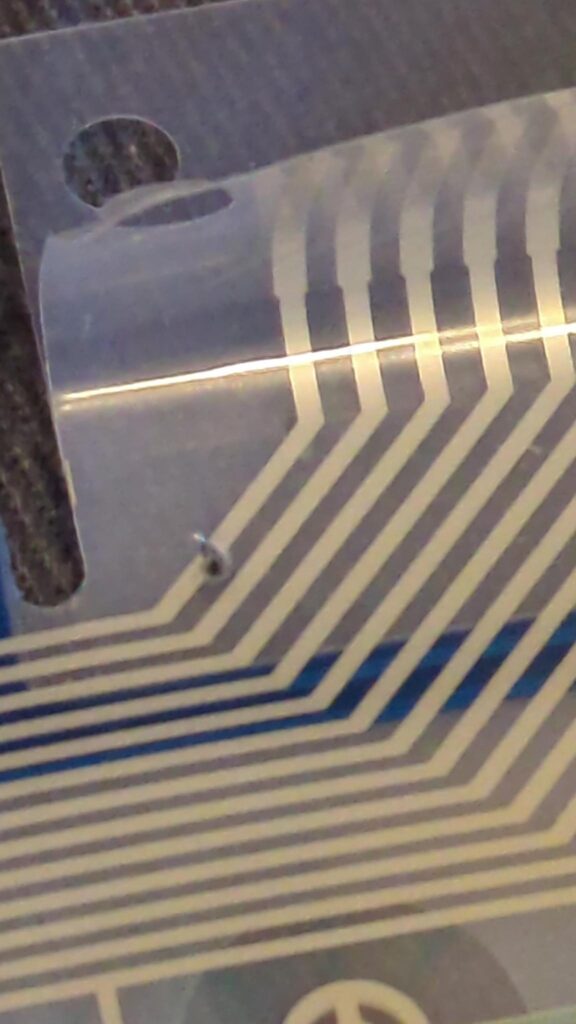
Here is the membrane sheet connected to the touchpad. Can you spot the connection break? Look closely – it’s darker than the rest of the wiring.
To resolve this, we must gain access to the very wiring itself. At least in this use case, the membrane sheet folds over an insulation layer, which you could say is sandwiched in between. These layers are VERY thin and delicate – it relies on very small tolerances. Be careful! There is adhesive that must be split thru – you want to take great care NOT to tear the connection between, you’re only trying to separate it so that you can lay everything flat and unfolded.

After carefully splitting the adhesive, we’re now presented with the membrane sheet itself. Great! And I’m sure you can now very easily see the break in the connection. Make no mistake – that is the left click, but on the right side, because we’re now looking at it from behind.
Now, how can this be remedied? I did some research, and one site suggested to use copper foil tape, so I gave that a shot. I had some from another project from years ago.

Here is how that looks. Unfortunately, it was at this point I discovered that the sticky side of my tape doesn’t conduct well enough! I think it is conductive on both sides, based on my previous experiments, but for this task, it’s conductive enough. Ergo, it’s not conductive here. So unfortunately that got me nowhere.
Another suggestion I read mentioned using conductive silver paste. Hmm! Well I once had that a long time ago, but that bottle long since dried up and got tossed. So I ordered some from Amazon, and waited.

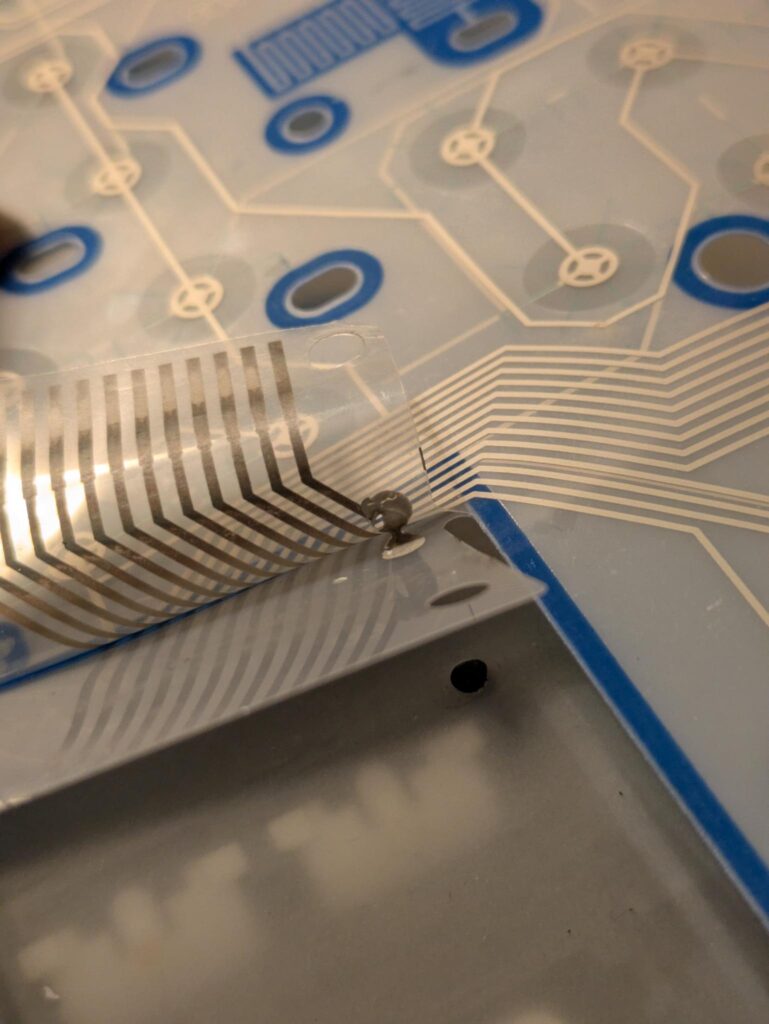
It came in, and here’s how it came out. Seems promising – my multimeter confidently beeps during a continuity test! That should do it! That didn’t happen before with the copper foil tape. Also visible in the above picture on the touchpad bracket is the telltale white, powdery residue of corrosion from a past liquid spill. Now, to let this stuff dry…
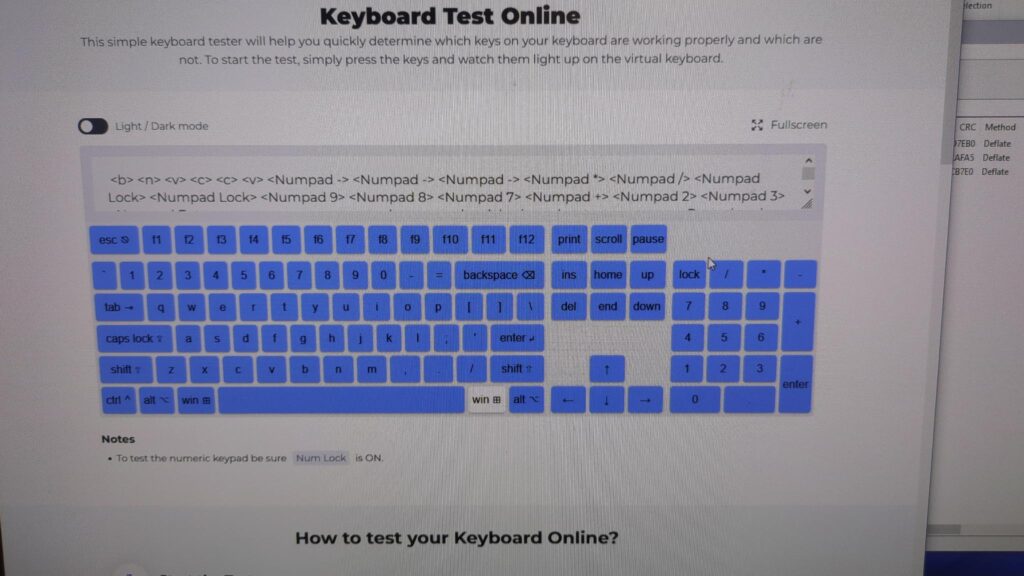
Though it is quoted to dry in 24hr, I didn’t get a chance until a few days later to check it out, Sure enough – it works!! Now the left click can be used!
Now, unfortunately, the plastic shim for holding the touchpad buttons themselves is brittle, and it wound up cracking enough that I couldn’t use it. So in the end, I did wind up buying another touchpad, since apparently someone had just listed one for just $12! What!?? Well, that’s okay! I now know exactly how to approach this problem the next time I might encounter it. And I made this article in hopes to help others just the same!
Chapter II – Unicomp (IBM) Model M Repair
Background
I bought a Unicomp keyboard brand new in 2015, custom-made, which I passionately used for a few years. I loved it! However, it was not without its flaws – only a month or two into using it, a few of the keys begun to lose some responsiveness. I believe some spring hammers had gotten dislodged.
At the time, I had sent it in for warranty service, and although they took care of it, some new issues had come up! These were minor, so I simply decided to let it fly. At least the keyboard fully worked, it’s just now the left click didn’t work, and the number pad plus sign key didn’t click, and required more pressure to operate.
With my preference changing over the years, I decided to shelve the Unicomp. Occasionally I would utilize it for testing purposes, but it mostly sat. I tried to sell it on eBay once, describing its flaws, but it wound up finding its way back to me still. That’s how eBay goes sometimes! I can say a thing or two about them…
The Repair
Here we are now, in March of 2026. I have since gained significant experience & confidence, and I felt it was time I gave a shot at repairing this keyboard!
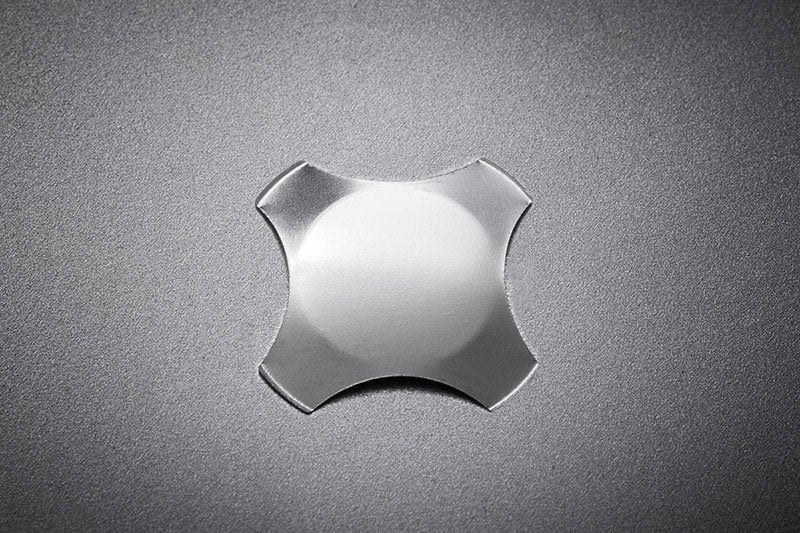
Firstly, I observed the mouse button situation. The issue is that the metal dome that provides the click & bounce was split in two! After some search, I did find a replacement available online.
However, the built-in pointing device was never great, and I seldom wound up using it. So, after giving this thought, I opted to simply rip out all the guts of the pointing device, and convert this into a regular Model M. A fully working keyboard is all I really want!
This was very easy to do. The pointing device module is simply mounted on top of the baseplate, under all of the keycaps. Pulling out a trio of metal clips allows the pointer to be lifted out, and a four-pin interconnecting flex cable binds it to the keyboard controller board.
The mouse buttons themselves are wired thru the very same membrane that hosts the keys. I warmed up my hot glue gun, folded the membrane onto the bottom of the metal backplate, then glued it down. I then took the plastic button shims (the part you actually touch) and glued them at the exact position in which they’d be when not pressed. I think this is a good solution, because in fact, Unicomp’s regular Model M keyboards still have an area where those mouse buttons would be that makes itself visible. So, this is a lot like that! Works for me!
Now with the pointing device out of the way, how about the keyboard itself? In some earlier experimentation in cleaning this keyboard out, I had mistakenly used the wrong screws to fixate the keyboard controller, which caused a pinhole in the membrane that severed one very important connection point. Whoops!
At that time I didn’t know what had happened. I had to disassemble the whole thing to get to this point.
This is a process very commonly documented online, but not something I had done before. In short, the whole barrel plate is fixated with plastic rivets to the backplate, sandwiching the membrane layers in between. To take it apart, you must first remove every key, then pop the plastic rivets, freeing each part. You must be very careful to keep the barrel plate upside-down! If you turn it over, ALL of the hammers will fall out, leaving you with an even more tedious reassembly project.
Ideally you want to keep the barrel plate very much still, propped between two heavy objects (I used two old PC optical drives, but bricks would be much better).
Thankfully, some silver conductive paint from Amazon made the membrane repair an absolute cinch! After letting it dry, I confirmed with my multimeter that the connection was indeed repaired. As far as reassembly goes, most people recommend doing a bolt mod.
However, I honestly didn’t feel like drilling copious amounts of tiny holes into the barrel plate. So I thought, why not simply melt the thing back together, just like from the factory? Sure it’d make re-disassembly a chore, but assuming everything goes right, this is ideally the last time the keyboard will ever be taken apart. And I want a solution, and I want it sooner rather than later, and without drilling holes.
So that’s what I did – I took each rivet I was able to save, and melted it back on with a soldering iron. NOT pleasant stuff to breathe I might add – please use a mask, or at least a fume extractor. And for whatever rivets I had lost, I simply flowed some scrap 3D printer filament as a new plastic to seal it further shut.
Well, some futzing around with a few stubborn hammers later, and the sucker works!! Mostly. So what’s going on?? As it turns out, I also found that the secondary membrane sheet of the two can sometimes have intermittent contact with the primary.
After verifying all rivets are in place and pushed as tightly as could be, I simply stuffed a tiny plastic Ziploc bag I found on my floor to press it all together. Behold, now it works!!! And without even having to drill a single hole – here’s to hoping I never need to open it up again!
Footnote: For the record, I do understand that part of the problem of plastic rivets is that they’re of course not as durable as using bolts/screws. But again, this was a compromise I was willing to make. If stuff starts popping off, I can certainly revisit it if I must. Or, you know, just put more plastic in it and pretend it’ll never happen again!